Setelah menginstal Panel Kontrol XAMPP di Windows 10, banyak pengguna melaporkan mengalami kesalahan saat memulai Apache . Masalah ini biasanya terjadi ketika proses seperti World Wide Publishing Service tetap berjalan di port 80 perangkat Anda. Karena itu, sistem operasi Windows 10 tidak mengizinkan server Apache untuk dieksekusi, dan hal itu menyebabkan kesalahan.
5 : 38 : 38 PM [ Apache ] Error : Apache shutdown unexpectedly . 5 : 38 : 38 PM [ Apache ] This may be due to a blocked port , missing dependencies , 5 : 38 : 38 PM [ Apache ] improper privileges , a crash , or a shutdown by another method . 5 : 38 : 38 PM [ Apache ] Press the Logs button to view error logs and check 5 : 38 : 38 PM [ Apache ] the Windows Event Viewer for more clues 5 : 38 : 38 PM [ Apache ] If you need more help , copy and post this 5 : 38 : 38 PM [ Apache ] entire log window on the forums Sebenarnya, Port 80 di komputer juga dulunya adalah port TCP / IP default yang digunakan modul Apaches di XAMPP. Dan karena dua aplikasi berbeda tidak dapat menggunakan port jaringan yang sama, oleh karena itu Anda harus menghentikannya sebelum memulai server Apache XAMPP. Jika Anda juga mengalami masalah ini di perangkat Anda, ada beberapa solusi mudah yang telah saya sebutkan dalam panduan ini. Jadi, mari kita mulai.
Apache tidak dimulai dari Panel Kontrol XAMPP
Menghapus Layanan Penerbitan World Wide Web akan menjadi pendekatan terbaik untuk memulai kembali Apache. Namun, Anda juga bisa mendapatkannya dengan mengubah nomor port TCP / IP atau dengan menghentikan layanan jika diperlukan. Jadi, untuk memperbaiki Apache tidak dimulai pada XAMPP Control Panel, ikuti semua metode yang mungkin berikut:
- Clear World Wide Web Services
- Ubah port default Apache TCP / IP
- Hentikan Layanan Penerbitan World Wide Web
Mari kita lihat secara detail.
1] Layanan Clear World Wide Web
Untuk mengatasi masalah awal layanan Apache, Anda harus menghapus World Wide Web Services dari perangkat Anda. Tetapi sebelum memulai, pastikan Anda tidak memiliki aplikasi apa pun yang mengandalkan layanan ini.
Jika semuanya tampak baik-baik saja, buka Control Panel pada sistem Windows Anda.
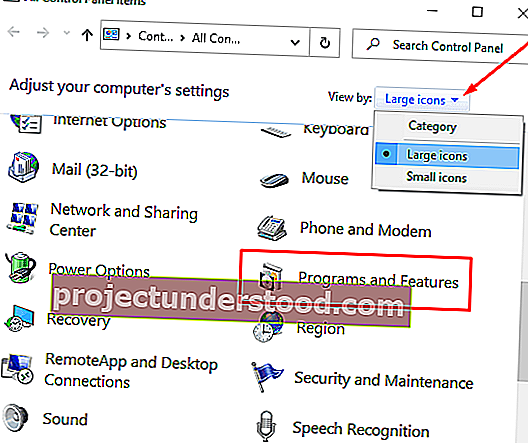
Setelah terbuka, pilih untuk melihat Panel Kontrol dalam opsi Ikon besar atau Ikon kecil , sehingga Anda dapat melihat semua item Panel Kontrol.

Dari item yang tersedia, pilih opsi Program dan Fitur .
Di sidebar kiri, ada tautan bernama Aktifkan atau nonaktifkan fitur Windows , klik di atasnya.

Di kotak dialog Fitur Windows, luaskan bidang Layanan Informasi Internet .
Sekarang, kosongkan kotak centang mengenai World Wide Web Services dan kemudian klik tombol OK untuk menyimpan perubahan.

Setelah Anda menyelesaikan langkah-langkah di atas, reboot perangkat Anda. Setelah itu, buka Control Panel XAMPP dan klik tombol Start di Apache. Sekarang seharusnya berjalan di port 80 di komputer Anda.
2] Ubah port default Apache TCP / IP
Jika karena alasan apa pun, solusi metode di atas tidak berhasil untuk Anda, Anda perlu mengonfigurasi Apache untuk dijalankan pada port TCP / IP yang berbeda. Jadi, ikuti saran ini:
Buka Panel Kontrol XAMPP di perangkat Windows Anda.
Klik pada tombol Config dari modul Apache.
Pilih opsi Apache (httpd.conf) dari daftar menu pop-up.

Di halaman notepad berikut, Anda perlu menemukan Listen 80 .
Untuk mempermudah pencarian, tekan tombol pintas Ctrl + F. Di menu pop-up, ketik apa yang ingin Anda cari. Tandai kotak centang Membungkus , biarkan kotak Pertandingan tidak dicentang, dan kemudian klik tombol Temukan Berikutnya .

Setelah Anda menemukan baris masing-masing, ubah nomor port dengan nomor sembarang pilihan Anda.
Misalnya, Anda dapat mencoba port 121. Maka hasil yang sesuai untuk nomor port TCP / IP akan menjadi seperti - Dengarkan 121 .
Tekan Ctrl + S tombol pintas untuk menyimpan perubahan di Notepad.
Note: Please note that while using this configuration, you always need to append the TCP/IP port number on the URL you want to connect to your site. For instance, to access the Apache server on your browser, you will need to enter: localhost:121/dashboard rather than localhost/dashboard.
After performing the above steps properly, the starting problem of the Apache in XAMPP would be fixed.
3] Stop World Wide Web Publishing Service
In an alternative way, you need to stop the World Wide Web Publishing Service and change its settings so that the service can only be started manually. So, let’s get started:
In order to stop the World Wide Web Publishing Service, you first need to open Windows Services Manager on your Windows 10 PC.
On the Services screen, search for the World Wide Web Publishing Service option under the Name column.
Once you find, double-click on it to open the properties window.
In the properties window, the General tab opens by default.
On the General tab, locate Startup Type and switch it to Manual. This will let you start the service manually when it is required.
Moving ahead, stop the service running status and click on Apply >OK button.
Now, open the XAMPP Control Panel and click on the Start button to run the Apache server.
That’s it. I hope this guide would help you to fix the starting problem of the Apache service on the XAMPP Control Panel.
